 4eTurnTracker Documentation 4eTurnTracker Documentation
Contents
Introduction
The Toolbar
The Programmable Powers Dialog
Introduction
Installation and Upgrade
Mac OS X: Drag 4eTurnTracker to your Applications folder. To upgrade, simply replace the current 4eTurnTracker application.
Windows: Double click on the 4eTurnTracker.msi file. This will start the Windows installer. Upgrade should be automatic if the already installed version of the program is older.
When started for the first time, 4eTurnTracker will create a folder called '4eTurnTracker Data' in your Documents folder if it does not already exist. This folder contains some example Characters, Monsters and Encounters, which you may delete if you like. It also includes a set of really cool Portrait images by Fiery Dragon Productions.
De-installation
Mac OS X: Delete the 4eTurnTracker application.
On the Mac 4eTurnTracker stores its settings in a file called 'com.4eturntracker.4eTurnTracker.plist' in your 'Library/Preferences' folders. You can delete the file on de-installation, or at any time you will like to revert to the default settings.
Windows: Use the Window Software control panel to de-install 4eturntracker. This will remove the program and any shortcuts created by the installer.
On Windows, 4eTurnTracker stores its settings in the Windows Registry. To delete them you need to start regedit.exe. Search for and remove the 4eTurnTracker settings which are stored in the user specific data section.
De-installation does not remove any '4eTurnTracker Data' folders created. These need to be delete manually.
Getting Started
As mentioned above, the program will create a folder called '4eTurnTracker Data' in your Documents folder. This folder contains example data, including Characters, Monsters and Encounters each in a sub-directory of the same name. In addition to this, images are stored in a sub-directory called 'Portraits'. When you 'Clear History', a backup of the old history file (history.log) is made in a sub-directory called 'History'.
In version 1.0.04 or later 4eTurnTracker searches all sub-directories of the 'Portraits' folder when loading an image. This makes it possible to organize a large number of images or simply drop in a set of images you already have. NOTE: if you assign an image to a Character or Monster, and the image is not already somewhere in the 'Portraits' folder, then 4eTurnTracker will copy the image to the 'Portraits' folder.
You can try out 4eTurnTracker by loading an encounter using the 'Load Encounter' button. Then click the 'Select Party' button and add some party members to the encounter. After this, click 'Start Encounter' to run the encounter.
You can create your own Monsters and Encounters using the 'Monster Manager' window, accessible from the Windows menu or toolbar. New Party members can be created using the 'Character Creator' window. Of course, you can delete the example data if you like. However, images in the 'Portraits' folder are not removed automatically by the program. If you remove images manually, be careful not to remove an image that is in use.
If you want to start a new campaign, I recommend that you duplicate the existing '4eTurnTracker Data' folder. Give it a name appropriate for your campaign. Following this you can manually remove Characters, Monsters and Encounters that are not needed in your new campaign. Then go to the File menu and use 'Select Data Location...' to select you new campaign Data folder. Now you can use the 'Monster Manager' window and 'Character Creator' window to setup the data for your campaign.
The Toolbar
  
|
Start/Stop Encounter (CTRL-N)
Starting an encounter is only possible when at least one Party member (Character) has been selected to take part in the Encounter. Add some monsters or select a prepared encounter as well, before your start the encounter.
Creature Visibility
The monsters you have selected for the encounter are not visible in the Player's Window until the encounter is running (i.e. after you press the start button).
Ensure that you explicitly hide monsters that should not be initially visible to the player's when the encounter starts.
Rolling Initiative
4eTurnTracker will roll initiative for all creatures when the encounter starts. The results are shown in the Initiative Dialog. The values in the input boxes are the result of the initiative dice (1d20) plus the initiative bonus of the creature.
The DM can either accept the result rolled by the program, or enter the result of a manual dice roll in the input boxes (of course, it is most likely that players will want to roll initiative themselves).
4eTurnTracker groups Monsters together for the purpose of initiative. This is in accordance with the rules, and is done to simplify combat management. However, you can elect to roll separate initiative for all monsters, or just for certain groups of monsters.
To roll initiative for all monsters in a specific group, click the arrow next to the name of the group (see the "Orcus Berserker" group in the screenshot below). Here it is also possible to accept the result rolled by the program, or roll the dice yourself (remember to add the initiative bonus to the value you enter).
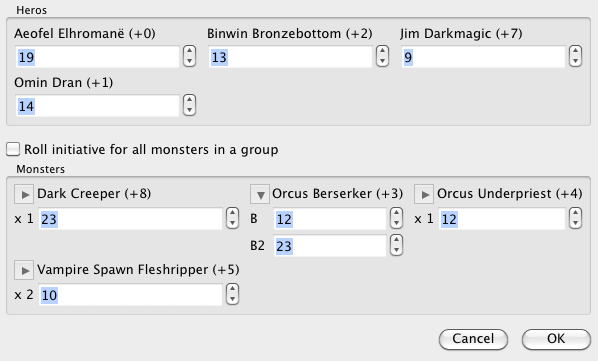
If you always want to roll separate initiative for all monsters, then click the checkbox "Roll initiative for all monster in a group".
Handling Initiative ties
This situation is handled automatically by 4eTurnTracker in accordance with the rules. Creatures with the higher initiative modifier come first. If this value is also identical then the program will pick a winner at random.
End of Encounter
When you end the an encounter, all monster will be removed from the Initiative List.
All effects accept those with the end condition "End Special" are removed. Characters that are dying are automatically stabilized. |


|
Back/Forward History (CTRL-Z / SHIFT-CTRL-Z)
Use these arrows to move forward and back one step in the Encounter History. You can also click on an item in the Encounter History List (see screenshot below) to move back or forward to a certain point in time.
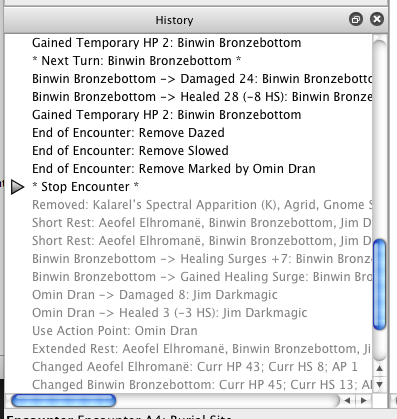
Warning! If you move back in the History and then execute some action, the history previously beyond that point will be lost.
Purpose of the Encounter History
The Encounter History serves the following purposes:
- Provides a way to undo actions that the DM entered incorrectly.
- Allows you to look back at an earlier point in the combat, if some part of the action is unclear.
- Used to restore the encounter state after restarting the program.
Clearing the Encounter History
You should periodically clear the Encounter History (use Clear History in the History menu) to prevent it from getting too long. The longer the history becomes the more time required to load the history on program startup.
The best time to clear the Encounter History is at the start of a gaming session, after an Extended Rest.
Note: Clearing the Encounter History resets all values to the default, so it is equivalent to an Extended Rest for all creatures.
4eTurnTracker will automatically make a backup of your old Encounter History in the '4eTurnTracker Data/History' folder, so that you can manually restore the History if necessary.
|

|
Next Turn (CTRL-N)
Advance to the next creature's turn. This will perform "end of turn" actions for the current creature, and "start of turn" actions for the next creature.
Saving Throws
If necessary, 4eTurnTracker will present a dialog with a list of saving throws that need to be done at the end of the current creature's turn. The value after d20 is the value rolled automatically by the program (see screenshot below).
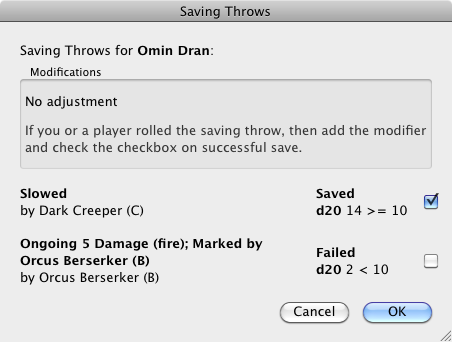
If the automatic roll value is 10 or more, then 4eTurnTracker sets the checkbox to "checked", which indicates that the saving throw succeeded.
The dialog will remind the DM of any known adjustments to saving throws, but does not adjust the automatically rolled values.
If you wish to use the automatic roll, then adjust the value after d20 by any saving throw modifiers that apply. Check the checkbox if the total is greater or equal to 10 (i.e. the saving throw succeeded).
If the DM or Player rolls the saving throw, then make the adjustments as usual and check the checkbox, if the saving throw succeeded. |

|
Delay Turn (CTRL-D)
Click this button if a creature chooses to delay it's turn. At this point the program performs "end of turn" actions for any beneficial effects.
The creature can then "jump in" at any time after this point, but initiative order will be permanently changed to the new position.
Note that if a creature does not jump in before it's turn comes around again, the turn is effectively lost.
|

|
Ready Action (CTRL-Y)
Use this button if a creature readies an action to be performed before the start of it's next turn.
4eTurnTracker will immediately perform "end of turn" actions for the current creature, and move to the next creatures turn. For this reason you should only click Ready Action, when all other actions of the creatures turn have been completed.
Note: If a creature does not use a readied action (by "jumping in") before it's next turn, the readied action is lost.
|

|
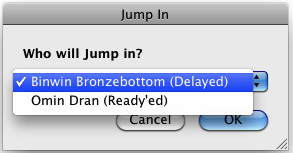
Jump In (CTRL-J)
Use this button to complete a delayed turn or perform a readied action. If more than one creature has delayed or readied, a dialog allows the DM to choose which creature will jump in.
Jumping in after delaying a turn
When a creature that has delayed it's turn jumps in, it is placed in the initiative order after the current creature. This also ends the current creatures turn.
It is likely that the players will indicate that they wish to jump in a bit too late, namely: just after the DM has advanced the turn marker. For example, they will say: "But I wanted to jump in before the Big Booger!". In this case, just hit back on the History, and then use the Jump In button.
Jumping in after readying an action
All this does is place the creature in the initiative order before the current creature. Any effects (damage, etc.) due to the readied action should be entered at this point.
However, in doing this, you may need to manually set the "Attacker/Origin" in the Programmable Powers (or Conditions & Effects) Dialog, because the attacker or origin of the effect is not the current creature!
If the creature uses a power as the readied action then clicking on the power in the creatures Stat Block will automatically set that creature as the Attacker/Origin of the effects.
|
 
|
Initiative Up/Down (CTRL-U / CTRL-D)
Use these buttons to move a selected group of creatures up or down in the Initiative List. Currently the rolled initiative value is not adjusted with the new position. This may be changed in future versions of the program.
Be careful when you move the current creature, because it may result in some creatures loosing their turn and others gaining an extra turn in the round. |

|
Apply Conditions and Effects (CTRL-A)
Click this button to enter the Conditions and Effects Dialog. You can choose between the "Programmable Power" and the "Classic C&E" version of this dialog using the bottom in the dialog's title.
The "Classic C&E" version of the dialog is for DM's that prefer to use the pre-2.0 version of the dialog.
However, the "Programmable Power" version of the dialog, new in 4eTurnTracker 2.0, is superior in every way, and can be used both for programming creature powers on the fly, and for adding ad-hoc condition and effects.
|
 
|
Hide/Show Creature (CTRL-H)
This button is used to hide selected creatures so that it is not shown in the Player's Window.
Hidden creatures continue to take part in the encounter, and can act as usual on its turn as the DM decides. When a hidden creature has its turn, the Player's Display shows the current creature to be the next visible creature, so that players are not aware of hidden creatures if they do not perform any noticeable action.
Here are some reasons for hiding a creature:
- Some Monsters may join an encounter at a later stage but theinitiative order of these creatures is determined at the start of the encounter. In this case, the DM should hide these creatures before the encounter begins.
- If a Monster becomes hidden from the Characters during combat (usually due to a successful Sneak attempt).
|

|
Set Alias (SHIFT-CTRL-A)
Use this button to set an "alias" name for one or more selected creatures. Use an alias if your do not want to reveal the real name of a creature to the players. Make sure that you enter alias names before you start the encounter to ensure that players do not see the actual name on the Player's Display, when combat starts.
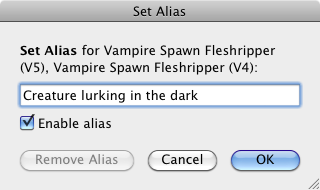
When an alias has been set, you can remove or change the alias in the header of the creatures Stat Block.
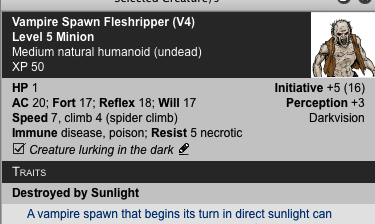
Click on the alias to remove or change the alias. Click the checkbox next to the alias name in order to enable or disable the alias. Note that if you disable the alias, then the real name of the creature is visible to the players. |

|
Remove Creature (CTRL-R)
Click this button to remove the selected creatures from the encounter. The most common use of this button is to remove Monsters from the encounter that have died.
However, this is not required. Dead creatures are automatically skipped on Next Turn. They are also not listed in the Initiative List in the Player's Window (instead they appear on the player's "Kill List"). |

|
Apply Damage (CTRL-T)
Used this button to apply damage to the selected Creatures. The amount of damage is determined by the value in the HP Box to the left of this button. The source of the damage is always the current creature.
This button provides a quick alternative to the Conditions and Effects Dialog for applying damage.
Note: There are a number of short-cuts for entering the amount of damage in the HP Box:
- Use the TAB key to change keyboard focus from the Initiative List to the HP Box.
- When selecting the creatures, click (left or right-click) in the Health column (containing the HP progress bar). In this case the HP Box is selected and you can enter a value immediately.
|

|
Apply Healing (CTRL-L)
Heal the selected creatures by the amount indicated in the HP Box. If "Spend Healing Surge" has been selected (see below) then this amount will be added to the creatures Healing Surge value.
|
 
|
Spend Healing Surge (CTRL-G)
Use this button to indicate whether a Healing Surge should be used, when clicking on the "Apply Healing" button. When activated the button displays a small "x 1" in the top corner.
In this case, the creature will spend a Healing Surge when you click Apply Healing. The amount of Hit Points restored is then the creature's Surge Value plus the amount in the HP Box.
This button is only enabled if a single creature is selected, and the creature has a Healing Surge available.
|

|
Set Temporary HP (CTRL-P)
Set the Temporary HP value of the selected creatures to the value in the HP Box. If a creature already has Temporary HP greater than the value in the input box, then the Temporary HP value of the creature will not be changed.
|

|
Select Party (SHIFT-CTRL-P)
Use this button to select the members of the Party. The Pick the Dialog lists all Characters available:
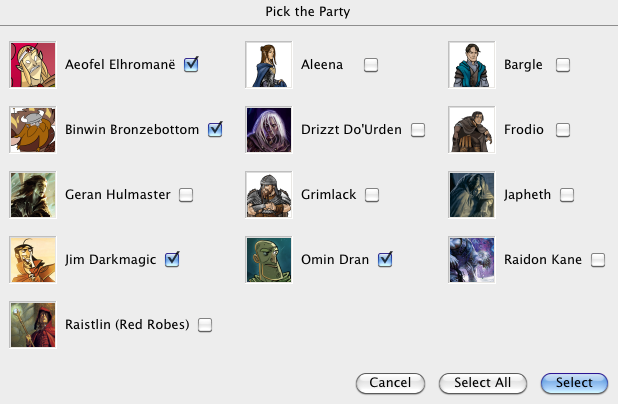
At least one part party member must be selected before an Encounter can begin. Check the checkboxes of the Characters that you want in the party.
When an Encounter is in progress you can only add party members. In this case, the checkboxes of the party members already in the encounter are disabled.
Party members are created using the Character Creator Window (see below). Note: 4eTurnTracker 2.0 allows you to add a Monster as a party member. |

|
Load Encounter (SHIFT-CTRL-E)
Select an Encounter from the list of prepared Encounters. Encounters can be setup in the Monster Manager Window.
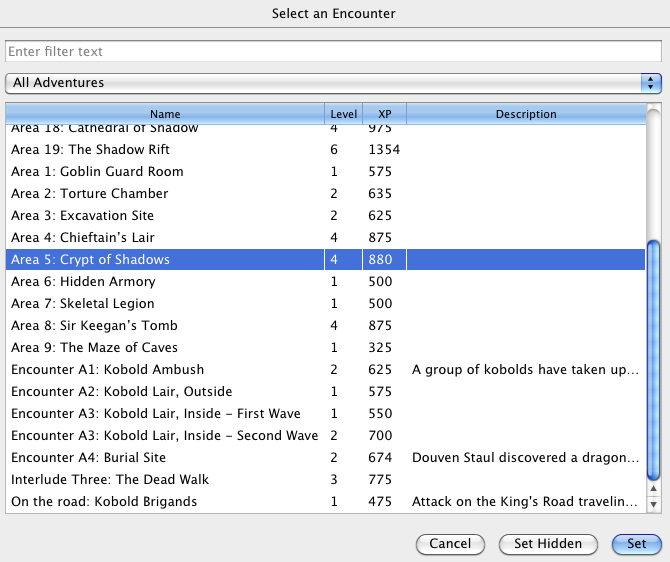
There are two ways of reducing the number of items listed. In the input box at the top of the dialog you can filter by some text that appears in the Encounter name. The popup below allows you to select the adventure in which the Encounter occurs.
Use the "Set Hidden" button to add a creatures in the Encounter as hidden (i.e. not visible in the Player's Window).
If an Encounter has already been set then buttons are provided to add the monsters of the new Encounter, or replace the set Encounter with the new Encounter. If the set Encounter is already running, then replacing the Encounter is not possible.
In all cases, new monster can be added hidden.
Note: If you add Monsters from a previous encounter, then the Monsters remain, damaged, dead, etc. In this case, 4eTurnTracker will ask you if you want to "reset" the monsters in the Encounter.
Adding Monsters to a running Encounter
If an Encounter is running, you can only add the monsters of a selected Encounter to the Monsters in the current encounter.
The monsters will be placed in the initiative order after the current creature. The initiative roll for added creatures only serves to determine the initiative order within the groups of the new Monsters.
If necessary you can use the Up/Down Initiative buttons to adjust the position of the added Monsters in the Initiative List. |

|
Add Monster (CTRL-M)
Use this button to spontaneously add a Monster to the Encounter. This can be done before or while an Encounter is running.
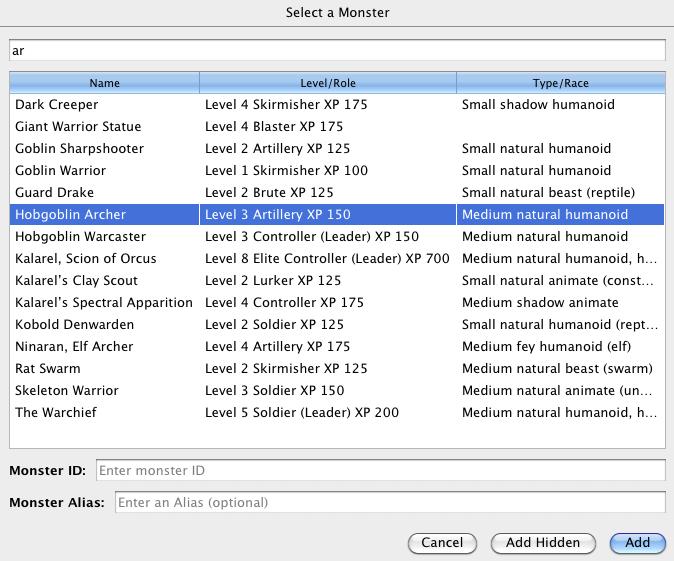
You can reduce the number of Monsters listed by entering a filter text in the top-most input box. Use the "Add Hidden" button to add the Monster as hidden (i.e. not visible in the Player's Window).
All Monsters you add to an Encounter must have a unique name, also know as the Monster ID. You can also specify an alias for the Monster you are adding. In this case, if the Monster is visible, the players will not know the real name of the Monster.
The Add Monster dialog is not suitable for creating Encounters on the fly by adding all the Monsters required to the Initiative List. Instead, use the Monster Manager Window to prepare an Encounter, and then use the Load Encounter button.
|

|
Short Rest (CTRL-E)
After an Encounter all members of the Party can take short rest. Clicking this button brings up the Short Test Dialog.
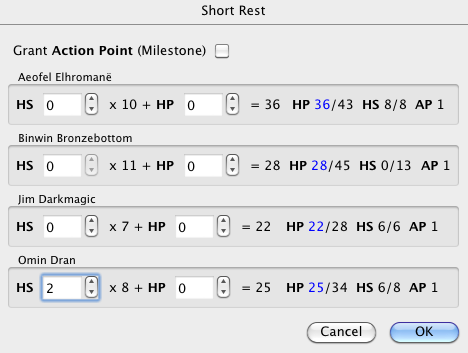
In this dialog you indicate how many Healing Surges are to be used by each Character. Bonus Hit Points (for example from the Cleric's "Healing Word") can be added to the total Hit Points granted by Healing Surges.
If the Characters have reached a Milestone (every second Encounter), then check the checkbox "Grant Action Point". This will add an Action Point to each Characters Action Point total.
|

|
Extended Rest (CTRL-X)
The Extended Rest button sets all statistics tracked for the Characters to initial values.
An Extended Rest does not affect the Monsters that took part in an Encounter. If a Character is suffering from a disease or something else that prevents complete restoration after an Extended Rest, then the Hit Points, Healing Surges, etc. must be removed again after the Extended Rest.
Effects that have the end condition "End Special" are not removed by an Extended Rest. Such effects can only be removed manually by the DM by clicking on the trash can in the Conditions and Effects list of the creature. |
 
|
Show/Hide Player's Window
This button will show and hide the Player's Window.
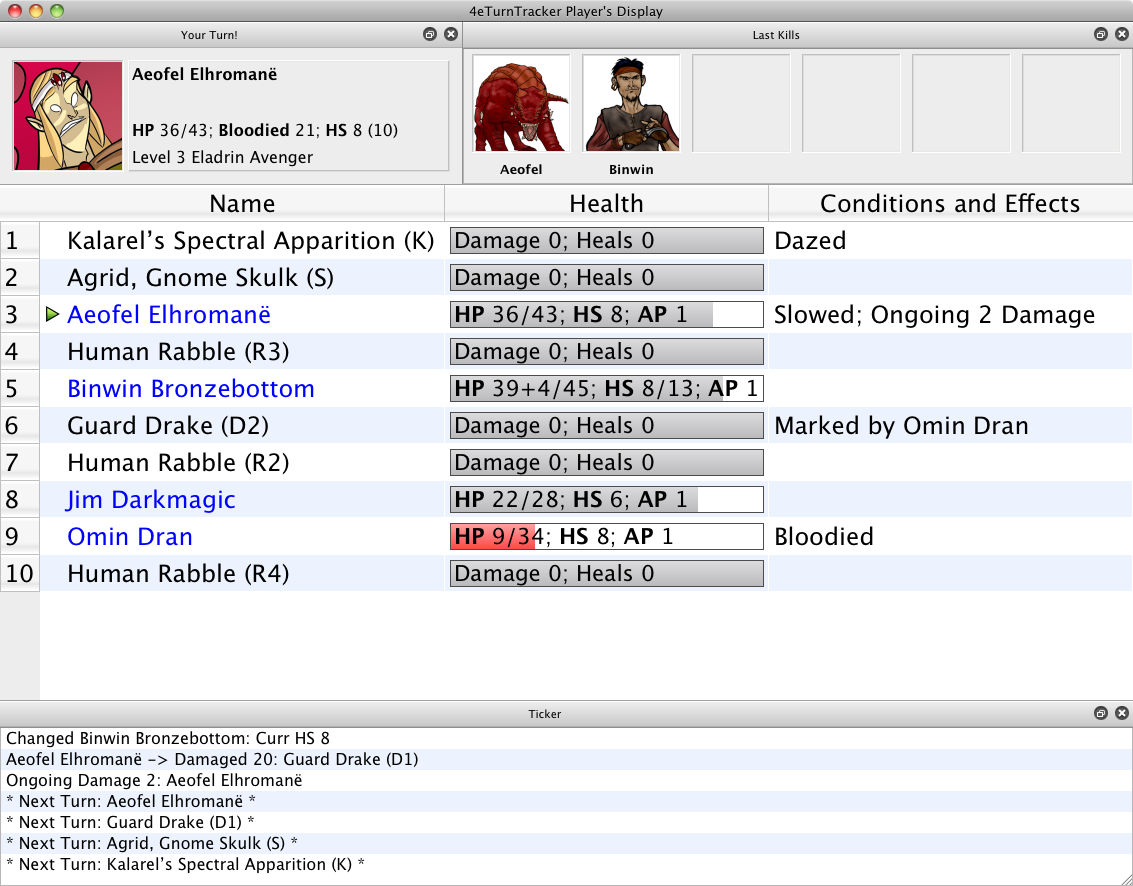
The Player's Window should be positioned on a second monitor for the players. It shows the initiative order of the Characters and all Monsters that are not hidden.
The exact Hit Point level can be seen of all Characters. For Monster's the Hit Point level shows 3 states: the Monster has not been hit (100%), the Monster has been hit at least once (less the 100%), the Monster is Bloodied (50% or less). When dead, Monsters and Characters are removed from the list.
|

|
Monster Manager Window
Click on this button to open the Monster Manager Window.
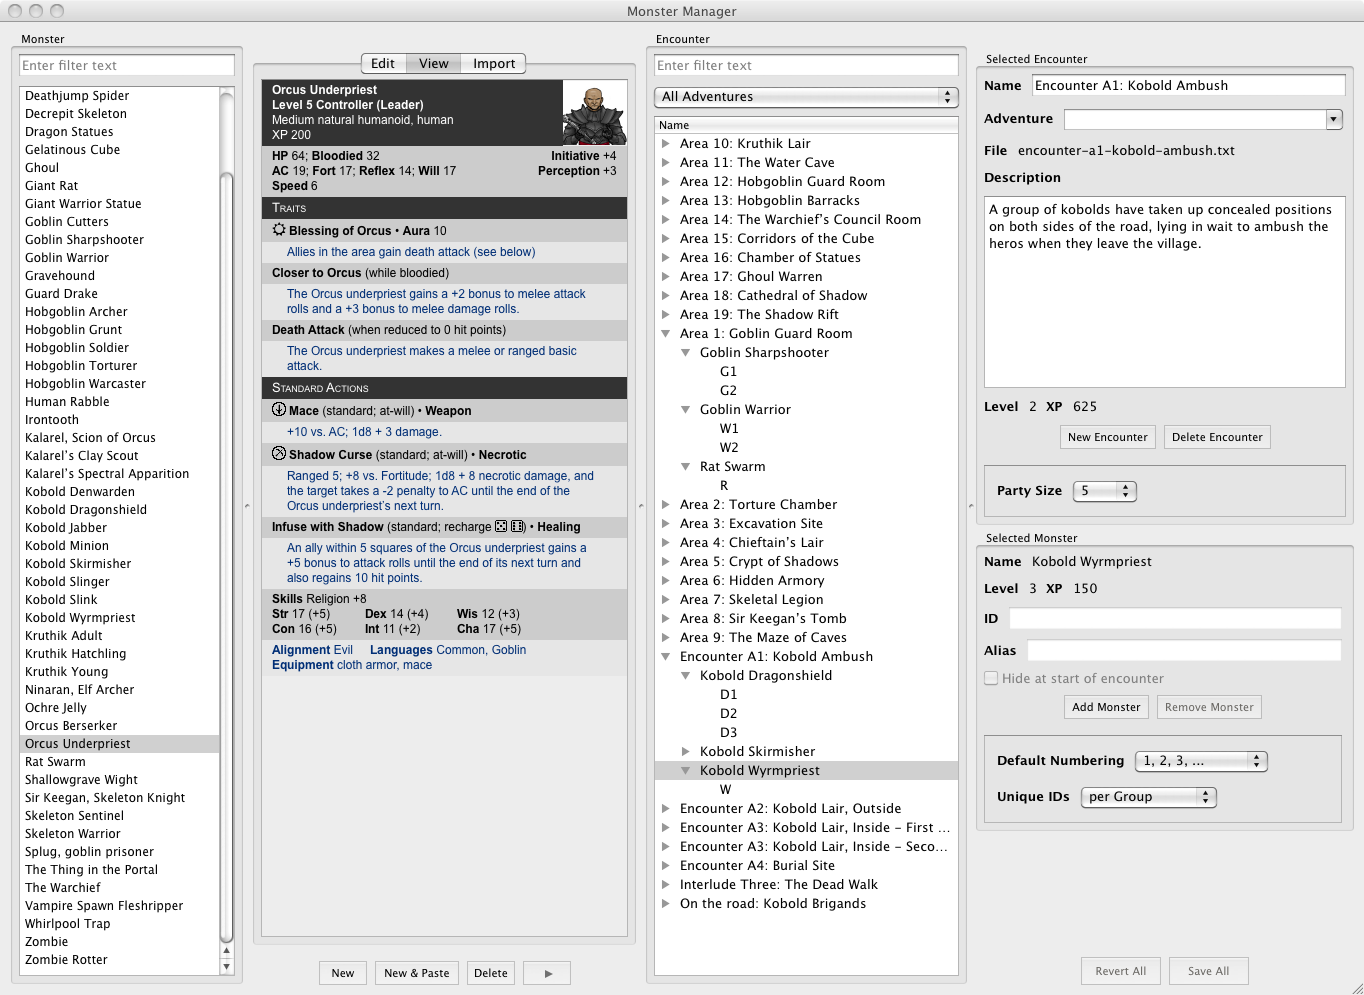
The Monster Manager Window is used to import Monsters and create Encounters. The list on the left contains all Monsters that have been imported. The list on the right contains the Encounters.
Monster can be imported either by copying a Monster Stat Block from a PDF or Web-page, or by importing a .monster file.
To import by copying a Monster Stat Block, select the entire text of the Stat Block in the PDF file, or Web-page (for example from the online D&D Compendium). Then click on the button "New & Paste".
You can export .monster files from the online D&D Adventure Tools. Save all the .monster files you want to import to a specific folder on your harddrive (for example: Documents/Monsters).
Then click on the Import tab in the Monster Manager window, click "Select Directory..." and navigate to the folder containing the Monsters. Now all you need to do is select the .monster files you wish to import, and click "Import Selection".
If you change the monster in the D&D Adventure Tools, then export the .monster file again. 4eTurnTracker will recognize that the file has changed and mark it with a star in the top right-hand corner:  . Click on the file and import again to receive the changes. . Click on the file and import again to receive the changes.
Create an Encounter by clicking on the "New Encounter" button. Enter the name of the encounter and select the Adventure or enter the name of the Adventure, if it is new. You can add a description of the Encounter if you like.
Add monster to the Encounter by selecting a Monster on the list on the left-hand side, and pressing the button with the right arrow (next the the "Delete" button). Monster added to an Encounter will automatically be given an "ID", according to the number schema you have selected. You can change the monster IDs as you like.
You can also give the monster an Alias name, which will be used when you run the Encounter. Use an alias to hide the name of the monster from players. The alias can be changed or removed later during combat.
Once you have finished making changes, use the button "Save All" to save all Monsters and Encounters that have changed to disk. You can also use "Revert All" to undo all changes. |

|
Character Creator Window
Click this button to open the Character Creator Window.
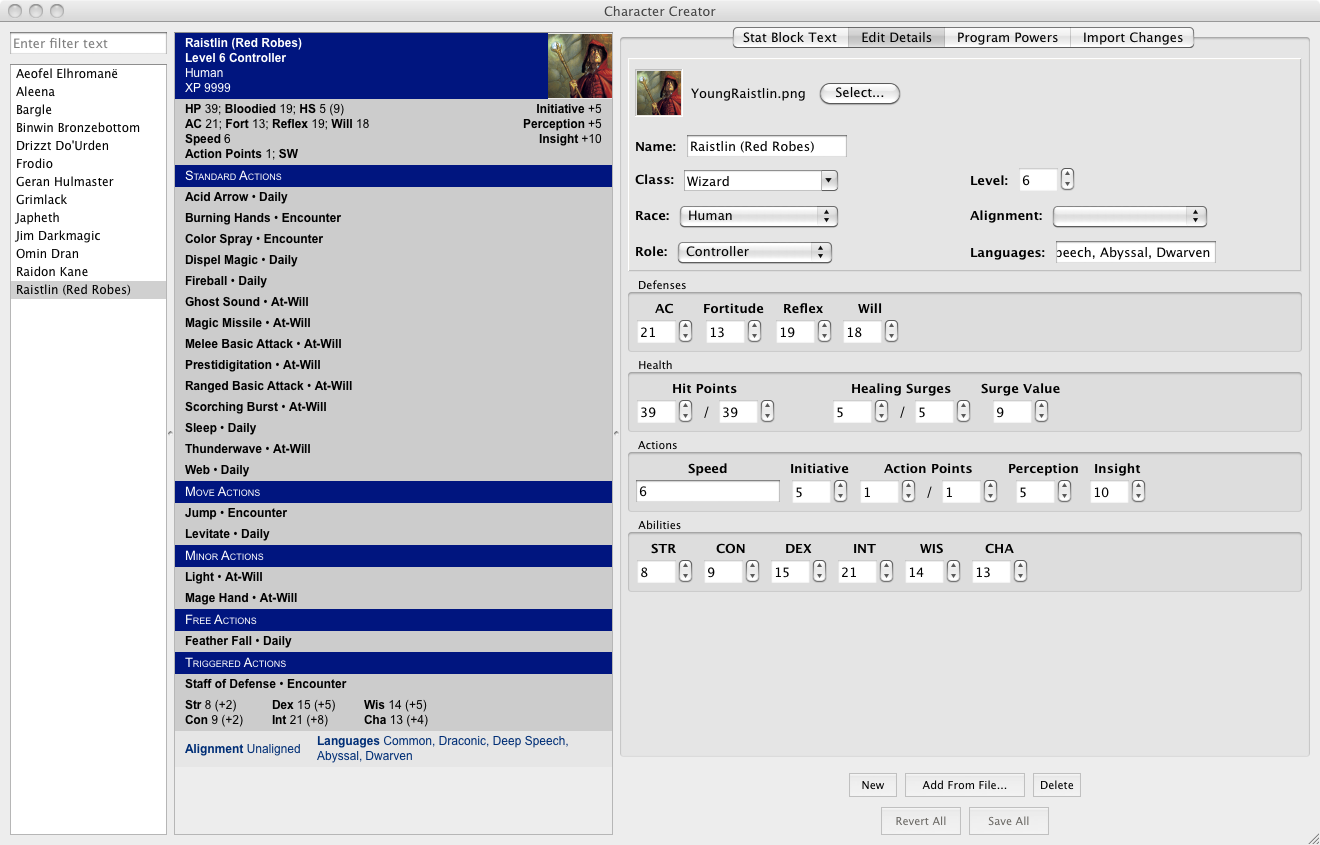
The Character Creator Window is used to create and import party members. There are a number of ways to create new party member:
Create Character Manually
You can create a new Character by entering all the required Stats manually. Click on the "New" button to create a new Character and switch to the tab called "Edit Details".
The "Edit Details" tab includes the Stats that are most important for tracking the Character during combat, for example: Hit Points, Healing Surges, Actions Points and defense values.
Once you have entered this data the Character is ready to be used in an Encounter.
Import From a .dnd4e File
The most common way to create a Character is to import the data from a .dnd4e file. These files are created when you export a Character from the online D&D Character Builder.
On export, place the .dnd4e file in a location on your harddrive that can be updated later when your character data changes (for example when you level up).
Click on the "Add From File..." button and locate the .dnd4e file. The Character data will be imported and the Character name will appear in the list.
If you make changes to your character in the D&D Character Builder, then export the Character again. If you write the .dnd4e to the same location, then updating the data in 4eTurnTracker is simple. Just go to "Import Changes" tab and click the "Refresh" button, to import the changes.
If the location of the .dnd4e file has changed, use the "Select..." button to locate it.
Import From a .monster File
A .monster file is created when you export Monster data from the online D&D Adventure Tools. Using the "Add From File..." button you can create a party member by importing the data from a .monster file.
In this case, it may make sense to switch to the "Edit Details" tab, and change the name of the Monster. Other details can also be changed which will not be overwritten if you re-import the Monster.
Create from Stat Block text
You can also create a party member by copying a Monster Stat Block from the D&D Compendium, or from a PDF file. First click the "New" button to create a new Character. Then switch to the "Stat Block Text" tab, and make sure that the "Stat block writable" checkbox is checked.
Now select all the text in the text area and paste the Stat Block data that you previously copied. The Monster name should immediately appear in the list.
You can now switch to the "Edit Details" tab, add a portrait and make any other changes you like.
Programming Powers
If you select a Character and switch to the "Program Powers" tab, you can select a Character power and program the effects of the power. Clicking on a power in the Character Stat Block will also take you to the Program Powers tab.
A power that is "pre-programmed" in this matter can save you a lot of time during combat. It is possible to specify the effects the power has on Hit and Miss, and any additional "side-effects" the power has on creatures that are not targeted (i.e. not attacked).
You can also specify the number and types (Allies, Enemies, Self, etc.) of creatures targeted and effected. The program will then narrow down the list that have to choose from during an encounter. |
The Programmable Powers Dialog
The Conditions and Effects Dialog has two modes: Programmable Power mode, and the Classic C&E Mode. You can switch between the modes using the button in the title area of the dialog.
When the dialog is running, all buttons in the Toolbar, and the associated menu items are disabled. Press ESC or the "Cancel" button in order to exit the dialog without applying any effects. Note that exiting the dialog in this manner will also cancel changes you made to powers.
Attacker/Origin Popup
This popup lists all creatures in the encounter. By creature selected by default depends on how you entered the Conditions and Effects dialog.
If you clicked on the "Conditions and Effects" button, then the current creature is selected by default. If you clicked on a power in a Stat Block, then that creature will be selected.
Powers Popup
The Powers popup lists all powers of the Attacker/Origin creature. If you clicked on a power in a Stat Block, then that power will be selected by default.
Any combination of effects that you apply in this dialog will be saved for the power you select here. For example, if you specify that the target takes fire damage and is weakened, until end of next turn, then 4eTurnTracker remembers this, and brings up this effect the next time you select the power.
If you do not select a Power you can still apply any effects you like, however, the combination of effects will not be stored.
The "Add Power..." option allows you to add a custom defined power to the selected Attacker/Origin creature.
Use "Duplicate Power..." to copy an existing power. You must provide a unique name for the new power. This is most useful if a power has Secondary or After Effects that are not applied when the power is first used.
Actions Popup
Actions are "global" powers that you can define yourself. In other words, Actions provide a way for you to store effect combinations that can be used by any creature.
Power Details Box
When you have selected a Power or Action, the Power Details Box appears.
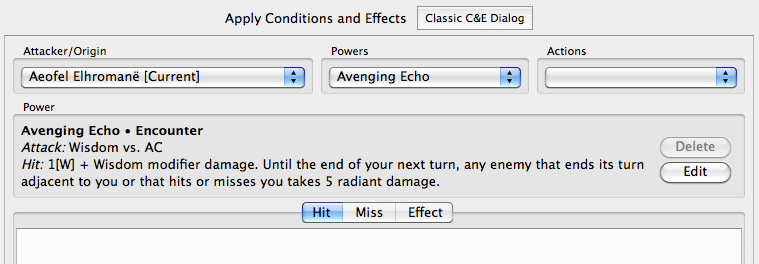
The Power Details Box contains a description of the Power. If the power is custom created, then you have an option to delete the power here.
You can edit the power details by clicking the "Edit" button. The most important settings for power usage are:
- Frequency:
For example: Daily, Encounter, 2/Encounter, Recharge 3, etc. Since 4eTurnTracker tracks the number of times a power is used, and rolls recharge, it is important that this value is set correctly.
- Targets (Hit and Miss):
Specify the type (enemy, ally, etc.) of the target creatures, and the number that are targeted by the attack. The targets are divided into miss and hit groups. If the power is not an attack, then select "None".
- Effected Creatures:
Specify the type and number of creatures that are effected by the list of effects specified in the Effect tab. If the power has no additional affect, then select "None".
Hit/Miss/Effect Tabs
Use the Hit, Miss and Effect tab areas to specify separate sets of effects.
Hit or Miss effects are applied to the selected targets of an attack power. It is not possible for a creature to be effected by both the Hit and Miss effects. So, 4eTurnTracker will prevent you from placing a target creature in both the Hit and Miss groups (see Pick Boxes below).
The Effect tab is used to specify a list of effects that can be applied to a separate group of creatures called the "effected creatures".
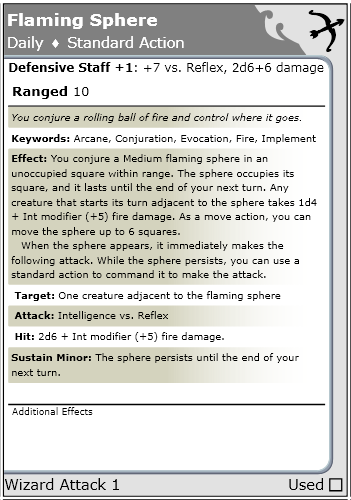
Here is an example of a power that has an effect in each of the 3 areas: the Warlock Attack, Well of Death:
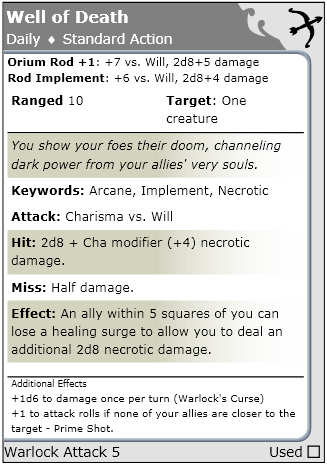
The power causes 2d8+5 damage on hit, half damage on miss, and has an effect on an ally at the same time.
You add effects to a tab area using the Effect Buttons (see below). The effects listed are applied to all specified creatures in order from top to bottom, when you click the OK button or hit RETURN.
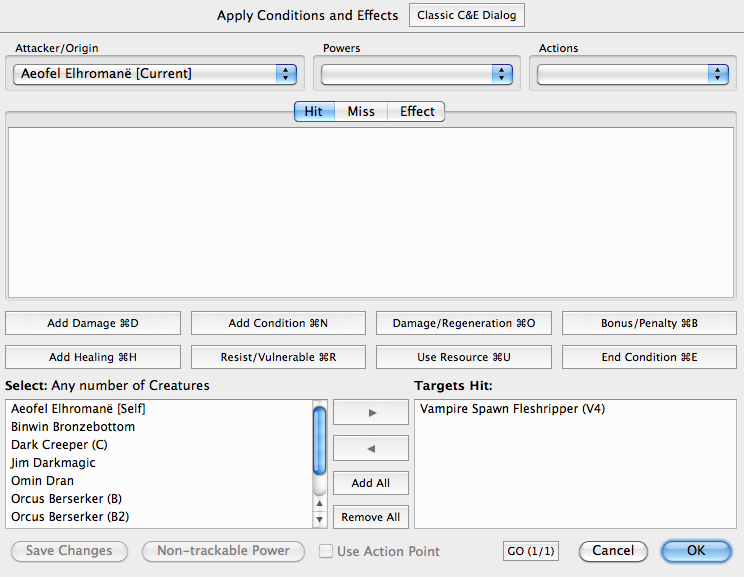
Pick Boxes
Using the Pick boxes you select the creatures that will be effected by the effects listed in the Hit, Miss and Effect areas.
The contents of the Pick Boxes change depending on whether the Hit, Miss or Effect tab is selected.
You can use the buttons between the boxes to move creature from one box to the other, but the quickest way to do this is to use the arrow keys, and the TAB/SHIFT-TAB key to move from box to the other.
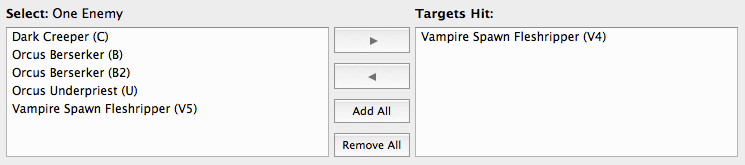
When the Hit tab is selected, the left-hand side box contains all potential targets as specified by the Power Details (i.e. Enemies, Allies, etc). The right-hand side box contains the targets that have been hit. However, depending on how you opt to select the targets missed, you should initially select all targets of the attack here.
When the Miss tab is selected, the contents of the left-hand box may be: all targets selected so far, or all potential targets, or all Creatures. Click on the down arrow, to select one of these groups (as you can see below).
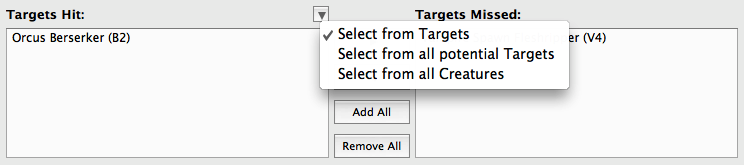
The right-hand box contains the targets that were missed by the attack.
So there are two ways of picking the hit and missed targets:
- First select all targets (both hit and missed), and then switch to the Miss tab and select which of the targets were missed.
- Alternatively you can select the targets hit from the potential targets, and then in the Miss tab, select the targets missed from all potential targets.
Whichever method you choose, keep in mind that the creatures that are selected before you enter the Conditions and Effect Dialog are automatically placed in the Targets Hit Pick Box.
Note that the program will automatically ensure that no creature is both hit and miss. So adding a creature to the Miss Pick Box will remove it from the Hit Pick Box and visa versa.
Finally, when the Effect tab is selected the left-hand side box contains the potential effected creatures as specified in the Power Details Box. The right-hand side box contains the list of creatures that will be effected by the effects listed in the Effect tab area.
Effect Buttons
Use the Effect Buttons to add affects to the Hit, Miss and Effect tab areas.
All effect buttons have a hot-key shortcut, not need to use the mouse. Within an effect line you can use TAB and SHIFT-TAB to move from one field to the next.
All controls can be manipulated from the keyboard, however, the keyboard shortcuts only work when you have focus on one of the controls in the line. When you have focus on a control, using the up and down arrows, or entering a number or letter will often will have some effect. You can also use mouse-over the control to discover the short-cuts for various controls.
Add Damage (CTRL-D)
If a power causes damage, the use the Add Damage button to add the damage effect.
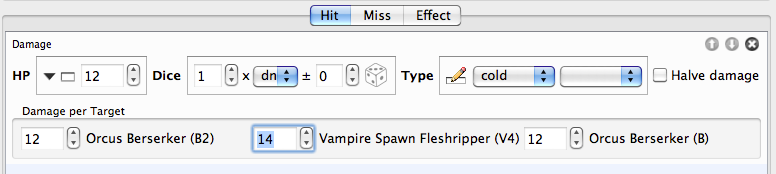
For most powers you will have to enter the amount of damage each time you use the power. In this case there are 2 possibilities. All targets take the same amount of damage, or the power may target a number of creatures which could take different amount of damage. In this case, click on the "Multi-damage button to open the "Damage per Target" box as you see above.
If you are entering a Monster power, then the program can roll the damage dice for you. In the Dice box, enter the number of damage dice, pick the type of dice (d4, d6, d8, etc), and adjustment. In this case, the program will automatically roll the dice when you select the power. You can also roll the dice immediately by clicking on the dice button.
In the Type box you can enter up to 3 types of damage (fire, cold, force, etc.). Click the symbol in the box to switch between popups and a free text fields, where you can enter any text comment you like.
The checkbox labeled "Halve damage" has a different function in the Miss tab area as apposed to the Hit and Effect areas. In the Miss tab area the label changes to "Half damage". If you check the checkbox here, the other damage fields are disabled. The amount of damage is then half of the amount specified in the damage effect in the Hit area.
In the Hit and Effect tab areas, the "Halve damage" checkbox is simply a convenient way to apply half damage when, for example, the attacker is weakened or the target is insubstantial.
Add Condition (CTRL-N)
Click the Add Condition button to add an ongoing condition to the Hit, Miss or Effect tab areas. If more than one condition applies, then add each as a separate line.

You can pick a standard condition from the popup, or you can enter a custom condition in the Comment text box (you can also do both, in which case the Comment is placed in parenthesis after the standard condition).
Normally you follow a condition with an "end condition" (see End condition below), which specifies when the condition will end (e.g. save ends, end of next turn, etc.)
You can use the Custom text box to specify any ongoing effect. For example, if a power creates a conjuration, like the Wizard power Flaming Sphere, you can describe the conjuration and its effect briefly in the text box: "Flaming Sphere: 1d4+6 to adjacent".
Since this is a separate effect of the power, not part of the initial attack, you should specify the condition in the Effect tab area. Set the target (effected creatures in this case) of the effect to "Self". Now the custom condition, which will appear as a condition on the caster of the conjuration, serves as reminder that the effect is in progress.
The checkbox "Positive effect" must be checked if the condition is of benefit to the target. The checkbox is automatically set correctly if you choose a standard condition, but must be explicitly set for custom conditions. For example, the conjuration described above is a positive effect.
The type of the effect, positive or negative, is important when a target somehow changes its initiative order (e.g. delay turn). The basic rule is that you cannot prolong a positive effect by changing initiative order, and you cannot shorten a negative effect by changing initiative order.
Damage/Regeneration (CTRL-O)
Use this button to add ongoing damage or regeneration.

Using the popup on the left, select Ongoing Damage or Regeneration and the one of the standard amounts. You can adjust the amount in the input box to the right of the popup if necessary.
Select the type of damage uses the popups or switch to the free text input field, if you would like to add a custom comment to the ongoing effect.
Check the checkbox "Prompt before applying" if you would like the program to prompt you before applying the damage or regeneration. This give you the possibility to cancel or change the amount of the effect each time it applies.
For example if a Troll receives fire damage during its turn the regeneration if canceled for that turn.
Bonus/Penalty (CTRL-B)
The effect applies an ongoing bonus or penalty to defenses (AC, Fortitude, Reflex and Will) attack (Hit and Damage) and to Saving Throws (Save).

Select the Bonus or Penalty from the popup on the left. You can adjust the amount of the bonus or penalty can be adjusted in the input box to the right of the popup.
Check the checkbox of the elements that are effected by the bonus or penalty. In the vs box you can select a damage type or enter custom text associated with the bonus or penalty. Keyboard short-cuts are available for all checkboxes.
Add Healing (CTRL-H)
Click this button to add a healing effect.

On the left, use the popup to determine whether Healing Surges are spent, lost or gained. Check the checkbox, "Don't add value", if you want to subtract a Healing Surge from the target, without gaining Hit Points. Otherwise, using a Healing Surge will add the Character's Surge Value to the Hit Point total.
Note that if the target does not have any Healing Surges then this part of the effect will be ignored.
In the HP input box on the left you can specify a number of Hit Points to add to the targets Hit Point total. This value is in addition to the Healing Surge values specified.
The HP input box labeled "Temp" is use to set the number of Temporary Hit Points of the target. If the target already has Temporary Hit Points then this value is only changed if the value specified here is greater than the current Temporary Hit Point value.
Check the "Stabilize" checkbox if the power stabilized the target (which means the target need no longer make Death Saving Throws when the Hit Point total is zero or less).
Resist/Vulnerability (CTRL-R)
Click this button to add an ongoing resistance or vulnerability effect.

Using the popup on the left you specify resistance or vulnerability and the amount. If necessary, use the input box to the right of the popup to adjust the amount up or down.
The type of resistance or vulnerability can be specified in the Type box. You can pick up to 3 damage types using the popups, or switch to text input to enter a custom text if required.
Use Resource (CTRL-U)
If a power calls for the use of an Action Point, or the use of Second Wind, then click on Use Resource to add this as an effect.

Using the popup on the left you can specify a change in the number of Action Points. The popup on the right is used to specify if the Characters uses are regains his/her Second Wind.
NOTE: If the target creature has no Action Points or Second Wind (Monster do not have a Second Wind), then this effect is ignored.
End Condition (CTRL-E)
Using the End Condition button you can add an end condition to ongoing effects you have already added. For example, in the screenshot below, "Save ends" has been added to the ongoing "Weakened" effect.
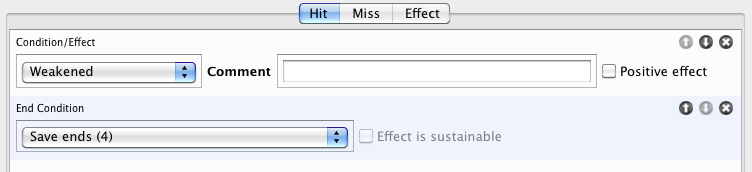
Ongoing effects include Conditions, Damage/Regeneration, Bonus/Penalty and Resistance/Vulnerability. The end condition applies to all ongoing effects above it.
So, for example, if you have a number of effects, and each require a separate saving throw, then add the end condition "Save ends" after add each of the effects. If one saving throw is required to end all effects, then just add one end condition, "Save ends", at the end.
The "Effect is sustainable" checkbox is used to indicate that an effect can be sustained. A good example of this is the Flaming Sphere power mentioned above:
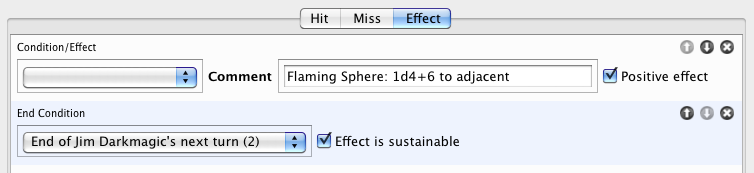
I this case, we have an effect that lasts until the end of the origins next turn but can be sustained. In this case, before the effect is ended, the program will ask the DM if the Character (or Monster) wishes to sustain the effect. If so, then the effect will continue for another round.
Dialog Buttons
There are a number of buttons at the bottom of the Programmable Powers dialog, as shown in the screenshot below.

Save Changes
Use this button to save changes you have made to a power, without applying the effects of the power.
Non-trackable Power
A Non-trackable Power is a power that has no trackable effects. This is usually powers that just involve movement, for example "Fey Step", which is a Encounter teleport power.
Even though such a power has no trackable effect, you may still want to track the usage of the power. If so, then click on the "Non-trackable Power" button.
Now, when you click on the power in the creatures Stat Block it will no longer invoke the Conditions and Effects dialog. Instead, the power will just be marked as used.
If you marked a power an non-trackable and you want to change this, then you can do this by clicking on "Edit" button in the Power Details Box, and changing the Targets (Hit and Miss) popup (which will be set to "Non-trackable Power").
Use Action Point
Use this checkbox to indicate that the Attacker/Origin creature is using an Action Point to perform the action.
GO Button (CTRL-G / SHIFT-CTRL-G)
The GO Button is a way of stepping quickly through the controls that need input when using a pre-programmed power. Use the hot-key, CTRL-G (command G on Mac) to step forward and SHIFT-CTRL-G to step backwards.
The GO Button first takes you to each Pick Box that requires input, starting with the selection of the targets Hit. It then takes you to the HP input boxes for all damage and heal effects. These are usually the only controls you need to visit if the power is already fully programmed.
The button show the number of "steps", and the current step. The last step is always the OK button.
At any stage hit ENTER to complete the dialog (see below).
Cancel Button (ESC)
Clicking the Cancel button cause all changes to a power to be discarded, and effects will not be applied.
OK Button (RETURN)
Click OK or hit the RETURN key to save changes you have made to the power (if a power is selected), and apply all effects and conditions specified to the targets and effected creatures.
|